Pages

Friday, 19 December 2014

BOOST Your Cable Locators Signal


BOOST Your Cable Locators Signal

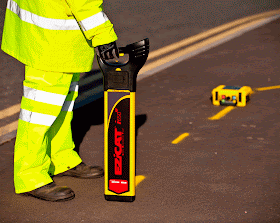
Locating buried cables by a Cable Avoidance Tool (CAT or cable locator) works by detecting electromagnetic signals passing through the utility (cable or pipe).

Where there is a weak or no signal present, the utility cannot be detected with just a cable. An artificial signal is applied to the utility to provide a detectable signal and improve the detection reliability. A signal generator (Genny) applies a signal to the utility, which the cable locator can detect.

The cable locator is set to the same signal mode as the genny. Commonly this is a 33 kHz signal, although other frequencies are also used with different characteristics and advantage depending on the site situation and application.


Boosting the Signal
Some applications may encounter a small diameter cable running in the ground, which on occasions may cause the signal from the signal generator to reduce in strength and become undetectable.

Some modern signal generators provide the option of increasing the signal frequency or increasing the signal power.

Cable Detection provides the ‘BOOST’ mode in their signal generators, increasing the energy transferred through the tracing utility above the normal level output. Where a 2x signal output results in 2x improvement in the CAT detected signal.

Cable Detection’s signal transmitters are available with increased output power setting controls, the T100 to a maximum of 1 Watt and T300 to a maximum of 3 Watt. The variable output power settings enable the operator to select the right level of signal boost for the site conditions, normally the power on "default level "is OK for most applications with good battery life and trace performance, rated at 100 mW, this is the common industry standard.

Where site conditions require increased performance the transmitter output setting can be increased to HIGH or BOOST levels, the site conditions for this might include greater tracing range, inducing a signal onto a deeper utility (where the efficiency is reduced) or where the cable impedance is high and low level of signal is present (small diameter cable).


Performance improvement
The performance of the combination between the cable locator and signal transmitter can be improved by increasing the signal frequency (131 kHz gives 4x improved signal over 33 kHz) or by boosting the power of the same signal x4 with T100 or x12 with T300.

It should also be understood that when increasing the signal frequency that the tracing signal will be increased but perhaps importantly the tracing range is reduced.

In comparison boosting the transmitter power delivers the same locating performance benefit and perhaps importantly for some users with the added benefit of the same tracing characteristics and increased range that may also be important.

Friday, 12 December 2014

Harness + Lanyard Inspection

Harness & Lanyard Inspection

Inspection of safety equipment is imperative to ensuring that the life saving equipment is in the best working order before and after every use. Failure to undertake this simple task could lead to a person working onsite being injured or even killed.

Inspection of equipment manufactured from webbing only takes a few minutes. Survey Express Services have produced a simple guide which can be downloaded.


Radiodetection gCAT4 GPS Cable Locator


Radiodetection gCAT4 GPS Cable Locator

Radiodetection has announced that they have extended their market leading CAT4 cable avoidance range to include fully integrated, automatic GPS and enhanced logging and data analysis capabilities.

Radiodetection gC.A.T4 incorporates an internal Global Navigation Satellite System receiver capable of acquiring multiple satellite systems to provide positional data which are logged every second into the locator’s internal memory.

Accurate Records
The enhanced logging capabilities of the RD gCAT4 allows accurate records to be kept and analysed, showing not only how an operator was working, but also where a C.A.T was being used.

No Operator Input
The new GPS feature needs no operator input to function. The Radiodetection gC.A.T4 locator starts acquiring a satellite lock when the trigger is first pressed, and once acquired maintains the fix for a set time even if the trigger is released, to be ready when next used.


Enhanced Data For Fleet Managers
The comprehensive data logging capabilities of the RD gC.A.T4 allow fleet managers to review one year or more of usage data which can then be used to assess individual locate operations in order to ensure compliance with best-practice, or to identify training needs.

By using the C.A.T Manager PC Software users can export CSV, XLS or KML files that can be quickly imported into map services like Google Earth.

Location of search area through Google Maps

Revolutionised Locating Industry
The Radiodetection C.A.T4 range, launched in 2012, has revolutionised the way the locating industry operates thanks to innovative features such as dual frequency small diameter cable locating and built in data logging, that have helped to improve the quality of locate operations and reduce cable strikes.

As detailed below, the Radiodetection gCAT4 incorporates the full range of features including datalogging, StrikeAlert, Swing alert, CALSafe and Bluetooth. The Radiodetection gCAT4+ features depth location.

Radiodetection CAT4 Options List


Authorised Dealer
Survey Express Services are the leading authorised dealer and service centre for all Radiodetection products. Being an authorised distributor, we maintain the highest standards befitting the quality of Radiodetection. Our support technicians are supplier trained to meet the manufacturer’s high standards. You will find a purpose built calibration centre in all our offices capable of maintaining your fleet of Radio detection cable locators. Read more


Friday, 21 November 2014

Lanyard Fall Clearances

Why is it important to know the stopping length of a fall arrest lanyard?


A fall arrest lanyard features a shock absorber which helps slows down the fall of a person. This additional length is in addition to the initial length of the lanyard. So hypnotically, a person could still receive major injury even though the fall arrest lanyard has deployed its shock absorber pack.

The overall combined length of the deployed lanyard and the height of the individual could be longer than the height of the fall. If so, injuring to the person will happen.

Fall Clearance
A 2.0m shock-absorbing lanyard allows for up to 2.0m of free-fall distance before activating, and another 1.75m of deceleration distance before arresting a fall. In addition you will have the height of the individual on top of the lanyard lengths.

So a simple calculation needs to be undertaken to understand the fall clearance:
Lanyard length – 2.0m
Shock absorber length – 1.75m
User length –2.0m
Over length of fall – 5.75m

If you have 5.75m of fall clearance or less, you're going to hit the ground.

It is advised to add an extra 1.0m to the overall deployed length to adjust for harness stretch and ‘D’ ring slip.


Anchor point will affect the fall clearance
Another element for safety of lanyards, is the position of the anchor point. The anchorage point should be at a height that minimizes the risk of contact with the ground or a lower level.

Why it is important to anchor as high overhead as possible?

If there is not enough room below to accommodate a potential fall clearance, use other equipment such as a restraint lanyard.


Restraint Lanyard
A restraint lanyard is to restraint the worker from approaching the fall edge and not to decelerate the fall. A restraint lanyard length should be specified to stop the person from gaining access to the edge of the floor or roof. This short length is to ‘restraint’ or prevent the fall, not assist in slowing of the fall.


Friday, 7 November 2014

Subsidence? Cracks in Walls? You Need a Tell-Tale


Movement in buildings occurs all the time. In majority of cases the extent is too small to be noticed. It is when the movement is great, large cracks in walls will appear, the problem needs to be addressed and resolved.

It is important to recognise that they are the visible symptom of possible problems.

Some causes of cracking include: settlement or foundation erosion, decay of materials, "vandalism" by renovators, structural failure, change in materials or geometry, and moisture and temperature changes.

1 Foundation Settlement
In foundation piers and piles, general cracking is often due to settlement or rotation of the pier footing.

2 Vertical Cracking
Vertical cracking or bulging of a masonry foundation wall is often due to physical deterioration of the pier from exposure, poor construction or overstressing.

3 Horizontal Cracking
Horizontal cracking or bowing of a masonry foundation wall may be caused by improper backfilling, or by swelling or freezing and heaving of water saturated soils adjacent to the wall.

4 Differential Settlement of foundation
Differential settlement of a masonry foundation wall may be caused by many different things including soil consolidation, soil shrinkage, soil swelling, soil heaving, soil erosion or soil compaction.

5 Differential Settlement of a chimney
Differential settlement of a chimney is often caused by inadequate foundations which may cause the chimney to lean and crack.


Monitoring Crack Movement
Assess cracks in buildings is important to establish whether the cracks in walls or ceilings are increasing in size and if movement has occurred.

The best method for measuring cracks is by installing a crack monitor or ‘tell-tales’ (generic name).

A crack monitor or tell-tales, is a simple and effective gauge to measure the movement of cracks in brick, concrete, or masonry structures.

Avongard Tell-Tale Crack Monitor

A crack monitor consists of two overlapping acrylic plates. One plate is white with a black millimeter grid, while the other is transparent with red crosshairs centered over the grid.

Once the crack monitor is in position across a crack, any movement will be recorded by the new position of the crosshair vertically or horizontally on the grid. This allows anyone to easily access and track the crack movement.
By utilising a crack monitor to monitor the movement of a crack, you will be able to build a picture of evidence, assess if the movement is still accruing and the direction. The tell-tales should be left in place for as long as possible to establish whether the crack is moving or not.


Positioning a Crack Monitor
Setting up a crack monitor is a simple process. When a crack has been identified, position the crack monitor over a suitable location that is accessible. You will need to revisit to take readings on a regular basis.
• Position the monitor over the crack with the vertical "0" line on scale parallel with the crack to be measured.
• Fix the monitor with screws or adhesive.
• Cut the transparent tape holding the two plates of the scale on the monitor in a fixed position with a sharp knife.
• Over time, the degree of movement on either side of the crack will be measured as the two plates slide independently of one another.


Advise on fixing the Avongard Tell-Tale
Ideally the Avongard Tell-Tale should be fixed with screws and adhesive reducing the risk of tampering if fixed with screws alone. We can supply the correct size fixings and adhesive.

On some surfaces there is no option but to use only adhesive. The adhesive must fully cure before the pegs are removed. The time taken for the adhesive to cure will depend on the ambient temperature, but the tell-tale must be held in position until the adhesive has hardened sufficiently for it to support the weight of the crack monitor.

Some customers use Blu-Tack to hold the crack monitor into position until the adhesive cures.


Taking Readings
All cracks monitors should be supplied with copies of a record sheet to record concurrent visits.

Record the position of the red crosshair


Once the crack monitor has been installed, record the position of the red cross on the grid for 6 – 8 weeks. Extended readings can be undertaken, but additional sheets will be required.

Improved measuring accuracy can be undertaken with a pair of calipers and using the Avongard Tell-Tale Plus. The resolution is improved to +/- 0.1mm

Use calipers to improve measuring accuracy

Monitoring Cracks Using the Avongard Crack Monitor
A recommended crack monitor is manufactured by Avongard who produces a number of professional crack monitoring systems. Formed in 1976, Avongard recognised there was a need for a simple but reliable calibrated gauge for the monitoring of cracks.

When utilising an Avongard tell-tales, you will be reassured that they are manufactured to the highest standard and quality. Avongard products are printed using the silicone pad and etched metal plates producing a finer and higher quality print.


Tuesday, 28 October 2014

How to Put on a Safety Harness


How To Put On A Safety Harness

A safety harness must be worn correctly to ensure that, in the event of a fall, it works to its design potential and does not cause additional injury. Follow these steps to don your harness correctly.


HARNESS CHECKLIST
A. Ensure that the right harness is used for the job.

B. Check that the harness has been inspected.

C. See that all clips and connectors are tightened, adjusted and attached.

D. Make sure that the webbing is adjusted to suit your body size - leaving the harness loose around the legs and chest may feel more comfortable but, in the event of a fall, the sudden 'jerk' that occurs when the slack is taken up can cause serious damage to the body, especially in the groin area and internal organs.


6 SIMPLE STEPS
6 Simple steps to the correct procedure for putting on a safety harness

Step 1
Hold harness up by rear attachment and ensure leg straps hang free


Step 2
Pass arms through shoulder straps


Step 3
Connect chest buckle


Step 4
Adjust shoulder straps so rear D sits between shoulder blades

Step 5
Pull harness down at the back so sub pelvic strap sits under the buttocks

Step 6
Connect leg buckles and adjust to a snug fit, ensuring they are assembled correctly


Click for more information of the Ridgegear range of harnesses


Monday, 20 October 2014

Approved Radiodetection Dealer

Approved Radiodetection Dealer

Survey Express Services, are the leading authorised Radiodetection distributor, offering sales, hire and support for the full range of cable avoidance equipment.

Radiodetection range is designed to detect signals whether generated by a signal generator, inherently radiating from metallic services, or from the complimentary range of Sondes (Mice) and accessories designed to enable the location of non-conductive services.

Cable avoidance equipment are classed as safety products which require maintenance and calibration. Failing to maintain equipment can mean services are missed or damaged during excavation with the possibility of injury to site personnel.

Annual calibration is essential to maintain your precision Radiodetection’s instrument within its original specifications. Every time a piece of equipment is utilised in the field, it should be accompanied with a traceable valid calibration certificate.

Being an authorised distributor, we maintain the highest standards befitting the quality of Radiodetection. Our support technicians are supplier trained to meet the manufacturer’s high standards. You will find a purpose built calibration centre in all our offices capable of maintaining your fleet of Radio detection cable locators.


About Radiodetection
Radiodetection are a global multi-technology company making your next construction project safer, quicker and more cost effective.

Founded in 1970, Radiodetection is headquartered in Bristol, UK, with worldwide sales and service network across the globe.

Utilities worldwide rely on Radiodetection Cable Avoidance Tools (C.A.T) to prevent accidental damage to underground services when excavating, and on Radiodetection’s RD7000+ and RD8000 products to accurately locate buried services. Radiodetection's cable test products quickly locate problems such as breaks or deteriorating insulation.

Every product in the Radiodetection range is designed and manufactured to the highest standards. Radiodetection’s manufacturing operations are ISO 9001 accredited, and our products benefit from a range of approvals in specific industries.


Brief History of Radiodetection
1970’s
Radio detection launched their first cable avoidance tool in the 1970s. The C.A.T (Cable Avoiding Tool) was a basic rugged locator designed for use by construction workers.

1980s
The RD400 Locator was launched and wins an international award at the Hanover Fair in West Germany selects the RD400 for its ‘outstanding industrial design’. The RD400 combined performance in an easy to use, rugged and ergonomic package.

1990s Radio detection’s C.A.T and Genny (MK2) launched, building on the success of the original C.A.T the new unit has many advantages while retaining its ease of use and ruggedness.

2000s – present
Radiodetection launches the RD7000™ and RD8000™ cable and pipe locator. The RD7000™ and RD8000™ are powerful successors to the industry standard RD4000 family of cable and pipe locators.

Radiodetection launches the new C.A.T and Genny MK4 offering groundbreaking features - delivering improved safety, faster surveys and simpler operation.

Radiodetection becomes part of the SPX corporation


Wednesday, 15 October 2014

Checking For Damp Within A Building

Checking For Damp Within A Building

Introduction
This article highlights basic understanding of moisture and provides techniques to look for damp and how to use a digital moisture meter to diagnose moisture levels. Due to the comprehensive nature of the subject, we have segmented down the original article into bight size subjects.

  1. What Is Damp?
  2. Difference in damp of materials
  3. How To Pinpoint Moisture within a Structure
  4. Measuring Moisture
  5. How To Check For Condensation 


1. What Is Damp?
Damp is caused by water getting into the property (structural) and moisture building up within the property causing condensation (lifestyle).

a. Damp ingress into a property (Structural)
Damp occurs when water penetrates into the fabric of a building. Common causes are:
  • Rainwater seeping through the roof where a tile or slate is missing, spilling from a blocked gutter or penetrating around window frames.
  • Rising damp due to a defective damp-course or because there is no damp-course.
  • Leaking pipes, wastes or overflows. Often you can see damp as “tide marks” on walls and ceilings.

b. Condensation (Lifestyle)
Lifestyle moisture issues are caused by normal daily activities (taking showers and baths, washing and drying clothes, cooking and boiling kettles), all produce warm air containing large amounts of water vapour.

If the warm air can’t escape through an open window or air vent, it moves around until it finds a cold surface where it cools and forms condensation.

Condensation occurs on any cold surface which records a below dew point temperature (temperature at which saturated air releases surplus moisture vapour). This can be seen on a mirror in a bathroom or a window in a kitchen when cooking.


2. Difference in damp of materials
Building materials will absorb different levels of moisture content, some materials, like wood, can absorb more water than brick.

Commonly timber will absorb more water molecules than a brick wall. Wood is like a sponge, absorbing moisture directly from the buildings structure and retain higher levels of moisture before directly being affected by the damp process.

The follow table provides examples showing the percentage moisture and the readings interpretation.


Material Moisture content % Interpretation
Wood Extremely dry
Mortar 4 Dry
Brick 4 Damp
Plaster 4 Very wet
Wood 12 Air dry
Brick 12 Saturated
Plaster 12 Not possible

As shown, wood can be classed as dry at 12%, but brick would be saturated at the same reading.

Example
A timber skirting which records a moisture reading of 12% (air dry), the plaster could be around 0.5% and the brick about 1%. In severe conditions you may see higher readings of skirting 22%, plaster 1% - 3% and brick around 2% - 5%.

Readings are taken on a reference scale as it is only a relative degree of dampness. Wood moisture scale (wood moisture equivalent ‘WME’) is the most common and is recognised by professional bodies. Wood is the first material to degrade due to damp.


How To Pinpoint Moisture within a Structure


How To Pinpoint Moisture within a Structure

First conduct a visual check to review the property for any signs of visible moisture damage. When verifying the buildings moisture condition, look for discolouration first. This will allow you to target the affected areas first.

Pinpointing the damp is only possibly with an electronic moisture meter. These instruments can detect moisture levels before they become visible or can be felt.

When measuring moisture, take regular readings over the suspected area and mark the boundaries of moisture levels. Develop a scaled drawing of the moisture readings recording the levels within the affected areas to determine the severity.

Pinpointing Rising Damp

Pinpointing Damp Spots

For a definitive guide into damp, I would recommend the Dampness In Buildings book distributed by Protimeter. This is a comprehensive guide to moisture in buildings and a copy can be purchased directly through our online store.


Measuring Moisture With a Protimeter Moisture Meter

Measuring Moisture With a Protimeter Moisture Meter

Reliable electronic moisture meters from Protimeter are the preferred instruments due to the renowned reliability, accuracy and quality.

Models include the ProtimeterDigital Mini (surface moisture) or Protimeter Aquant2 (subsurface moisture). Alternatively, you can combine the two functions by using a Protimeter Surveymaster2 which features both surface and subsurface moisture readings.


a. Surface Moisture
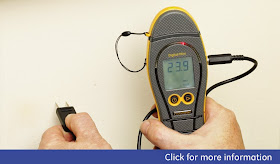
A pin type moisture meter, like the Protimeter Digital Mini, can be utilised to measure the surface moisture of a wall, wood and building structure. Simply place the pins on the surface of the wall to take a reading.


Protimeter Digital Mini measuring surface moisture


The Protimeter Digital Mini measures using the %Wood Moisture Equivalent (%WME) scale.

With a pin type instrument, it may be required to push the pins into the wall. Some types of wall coverings will restrict the reading. But a word of caution, pushing pins into a surface will leave a mark especially glossed paint, venires and laminated surfaces.

Taking readings in a kitchen or bathroom can be problematic with a pin type instrument. Floor coverings and tiles will provide a barrier stopping a direct reading with a pin type instrument. This is where you can use the radio waves of the Protimeter Aquant2 to detect the subsurface moisture levels.


b. Subsurface Moisture
A non-invasive (pin less) moisture meter will measure the subsurface moisture to a depth of 20mm. This is advised where wall, floor and wood covering prohibit moisture readings with a pin type instrument.


Protimeter Aquant2 measuring subsurface moisture


The Protimeter Aquant2 will measure using radio waves, penetrating beneath the wall surface including wall paper, paint and even tiles. This allows the user to undertake a very quick reading without damaging the surface. The Protimeter Aquant2 can also measure moisture in veneered wood like a build-in wardrobe, kitchen or fibreglass.

With the Protimeter Aquant2, moisture level is displayed as a relative moisture level between 0-999 %REL. The lower the reading, the drier the moisture content, higher the reading indicates higher moisture levels.


Moisture Readings
Protimeter Digital Mini (left) and Protimeter Aquant (right)


All Protimeter moisture meters will display the readings through a digital LCD display and a simple colour coded LED display.

The digital LCD display will provide the moisture reading (%WME or %REL). When undertaking readings, write down this measurement for future records.


To support the digital reading, Protimeter has developed a simple colour coded LED scale to indicating the moisture condition severity. This provides a very simple way to determine if the readings are Dry, Borderline and Damp.


Green - Dry
Air dry moisture content. No decay likely.


Amber - Borderline
Excess of moisture is present. This moisture cannot be attributed to high atmospheric humidity but to a definite source. If the reading in this zone persists or increases, remedial action is needed. Decay likely.


Red - Damp
A serious moisture condition exists and immediate remedial treatment must be effected. Decay inevitable.

Any material displaying a red / damp reading is too damp.


How To Check For Condensation


How To Check For Condensation

Condensation is caused by high air humidity levels created by common household tasks which produce high levels of water vapour (having a bath, running a shower and boiling water).

Condensation occurs on cold surfaces (window, mirror, tiles, glass) where the air borne water vapour condensates back into a liquid. Condensation is usually an intermittent phenomenon, occurring frequently in winter and at night. Therefore a range of readings will be required throughout the day in all rooms of the property.

When looking for condensation problems, check bathrooms, showers and kitchens. If condensation keeps occurring in the same place, it can cause black mold growth. The distribution of mold growth can be a useful guide to where condensation is occurring.

If you feel that condensation is a cause for some of the moisture problems, a digital hyrometer will accurately measure the airborne moisture which creates condensation. When measuring humidity, air temperature should be recorded at the same time.


Hygrometers from Protimeter are recommended like the Protimeter Hygromaster or Protimeter Physclone for their quality and accuracy.

Measure for levels of humidity first, if high levels are recorded then there will be a potential of condensation occurring in the property.


a. Measuring Relative Humidity (%RH)
Air humidity is measured against Relative Humidity (%RH) and is a simple procedure.

When undertaking humidity readings with the Protimeter Hygromaster and Protimeter Psyclone, the sensor is located at the top of the instrument.

The standard sensor has a reading range of 30 -100 %RH. A digital sensor featured in the Protimeter Psyclone records a range of 1.0 - 99.0 %RH.


After turning on the instrument, ensure the instrument is displaying %RH and air temperature (TA). The instrument will then read both airborne humidity and air temperature. Depending on lifestyle issues, different measurements will be required throughout the day to develop a pattern when humidity occurs, which room and cause of the humidity.

Internal humidity readings will increase if the outside weather conditions are damp.

Any reading over 70%RH will cause damage to natural materials.

Low %RH High %RH
Central Heating 20 45
Normal Room 35 75
Damp 75 100
Outside UK 45 100


The simplest way to record the humidity levels within a property is to develop a spreadsheet recording date, time, room, %RH and air temperature. Over the period of a day, a picture of the humidity fluctuations will be seen.

If high levels of humidity have been recorded, it is best to check the surface temperature to verify the potential of condensation.


b. Measuring For Condensation
Condensation is measured against the dew-point scale and requires surface temperature readings.

Both the Protimeter Hygromaster and Protimeter Psyclone can measure for condensation, reporting back the potential of condensation. An optional Surface Temperature Probe accessory is required to undertake this procedure.

By operating the Temp Diff function, the operator will be able to determine if surfaces are colder than the surrounding air temperature, creating condensation.

However with the Protimeter MMS2 instrument, the Condensator Mode enables the user to assess the risk of condensation occurring on surfaces or to confirm whether or not condensation is present on a surface.


Monday, 22 September 2014

Protimeter Digital Mini

Protimeter Digital Mini

Protimeter has officially announced the newly anticipated Protimeter Digital Mini – the third generation digital moisture meter.

If you want to achieve a high precision moisture reading combined with Protimeter’s outstanding quality, the Protimeter Digital Mini is an instrument you need to get your hands on.

Protimeter has been the leading manufacture of moisture measuring instruments, bring to market the very best instruments for the detection of damp within structures.


Digital Technology
The Protimeter Digital Mini builds upon the outstanding heritage of the Protimeter range by providing an accurate pin type instrument with digital technology. The user can read the measurements through a large LCD display and interpret the moisture level at a glance through the colour-coded LED scaled display.

The colour coded LEDs are synchronised with the digital display to provide information on the moisture condition of the material at the point of measurement. 60 colour LEDs display the severity of the moisture condition in three bands;
Green - Dry
Air dry moisture content

Amber - Borderline
Excess of moisture is present. This moisture cannot be attributed to high atmospheric humidity but to a definite source. If the reading in this zone persists or increases, remedial action is needed. Decay likely.

Red - Damp
A serious moisture condition exists and immediate remedial treatment must be effected. Decay inevitable.


Measure Moisture Below The Surface
Sub-surface measurements can be obtained by using the Protimeter Digital Mini with optional probes, such as the Hammer Electrode for wood, Deep Wall Probes for solid walls and the EIFS probe for exterior insulation and finishing systems.

Protimeter Digital Mini Design
The Protimeter Digital Mini follows the major revisions of Protimeter’s overhaul of the range. Incorporating a new, ergonomic designed case to improve comfort and handling, the Protimeter Digital Mini now features a large digital LED screen.

The reference mode is very useful when you have to compare measurements taken at numerous points in the building to a selected reference or baseline value.


Protimeter Quality Lasting Years
As a leading retailer and honest seller of equipment, we like to provide customers with the best instruments from all leading manufacturers. But all Protimeter products provide a lot more. Their very high quality means that you only need to purchase one instrument which will last for years. When we say years we do mean a long time.

In the unlikely event that your Protimeter receives a fault, the instrument’s is covered by a Protimeter 2 year warranty!


Verify Readings
Cheaper instruments may detect moisture, but you can’t guarantee their accuracy. With the Protimeter Digital Mini, you will receive a Calibration Check device that allows the user to verify that the readings are within the Protimeter’s high tolerance band.

After selling the Protimeter range for over 15 years, I have not received an instrument back that is not measuring within the specified tolerance. This can not be said for cheaper alternatives!

Often we hear from customers discussing their disastrous encounters with alternative manufactures. In one case their client challenged the readings which could not be supported, so losing credibility of the survey and having to refund the days fee.

So cheaper instruments will be cheaper, but they won't last as long, provide the same level of quality, provide you with verified accuracy and you will not receive the protection of a 2 year warranty!